Uploading Soumds to Beat Pads Mk2 Tracktion

I've recorded electronic drums many times using different techniques for both professional productions and practice sessions.
There is a lot of junk information out there almost how to do this. For example, I've read a guide online stating that you need to buy an external amplifier in order to tape your e-drums, claiming that this is what "creates the sounds," which is completely wrong.
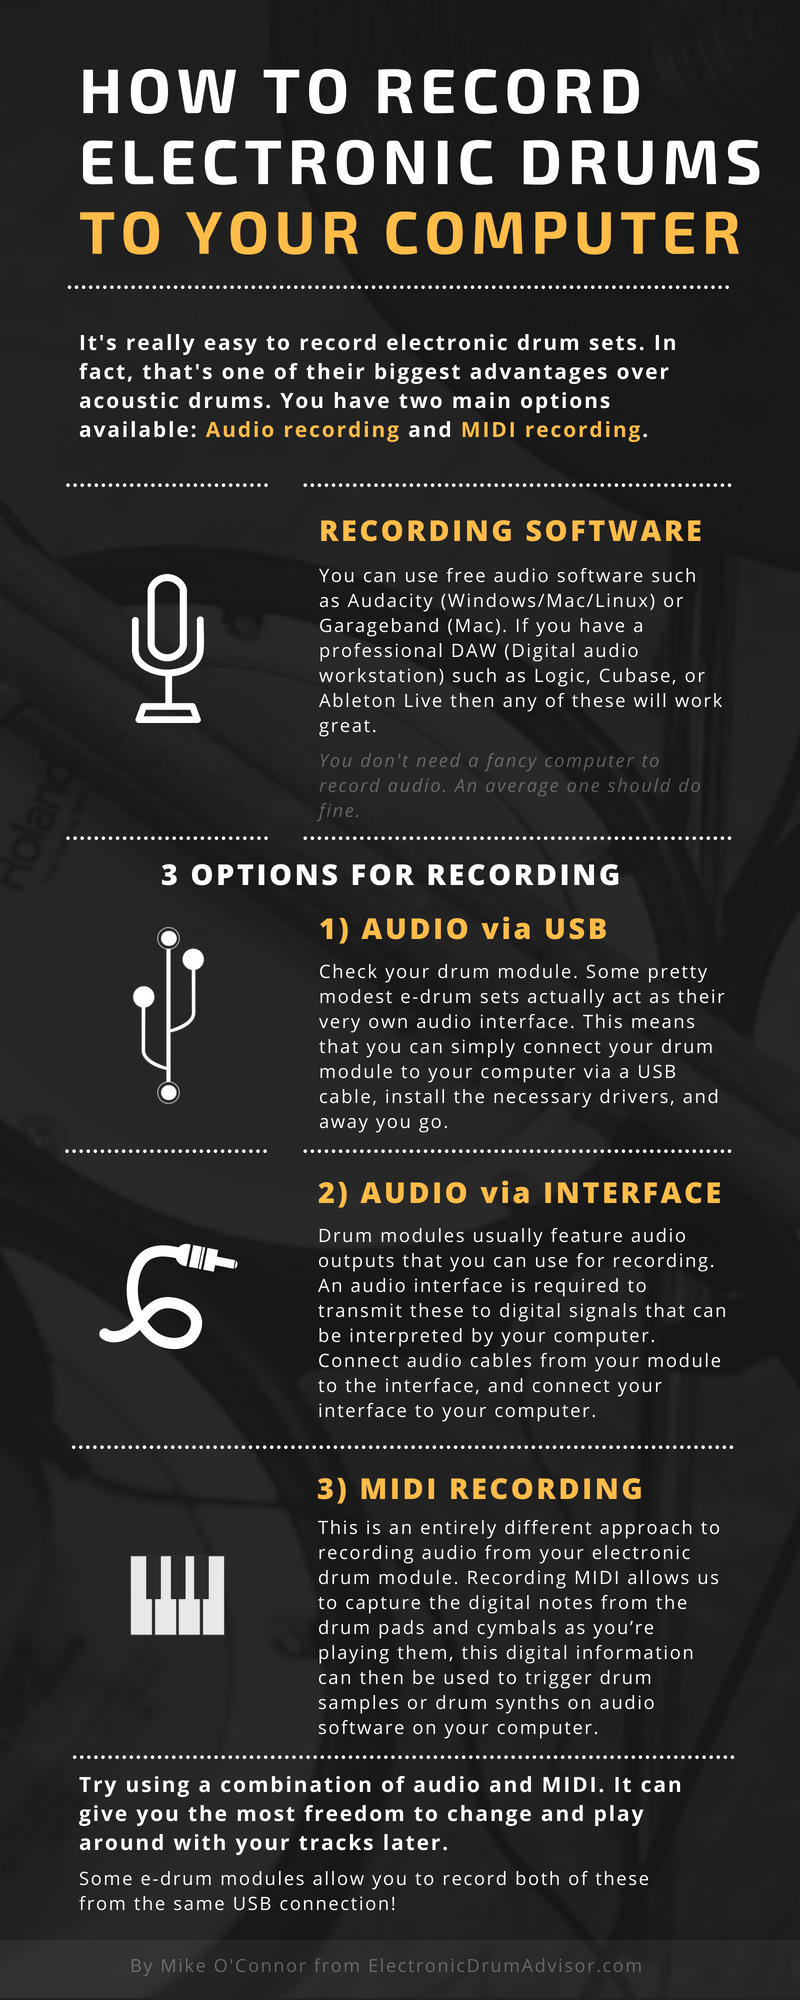
In this article, I'm going to tell you in simple terms how to tape from your electronic drum ready to your reckoner.
I of the biggest benefits of electronic drums over acoustic kits is their ability to be quickly and easily recorded with minimal hassle.
Y'all take a few options available to do this, though yous don't have to choose only ane. I recommend using a combination of sound and MIDI every bit it can give you the virtually freedom to change and play effectually with your tracks subsequently.
The same procedure of recording also applies to most electronic drum pads and pulsate machines.
Start by reading our infographic below. Nosotros'll dive deeper into these steps after.
There's besides a fourth selection which I haven't explained in particular here. This is to simply connect the audio output of your drums to either the "line in" or microphone input on your computer (if either of these are present on your computer). Withal, the sound quality of these can be very poor, specially the microphone input pick. To do so y'all will need a 1/iv″ to 1/8″ adapter, and if you're using the microphone input, then make sure to keep the source volume of your electronic drum ready low, otherwise the quality will likely be terrible!
Pick ane) Recording the audio output straight from your drum module via USB
All of the pads and cymbals on your electronic pulsate set are routed to your drum module (or drum brain, as it'south also referred as). The drum module is actually what creates the sounds, equally the pads and cymbals are but used to trigger these.
Check your drum module. Some pretty pocket-size modules such every bit the Roland TD-xi actually act as their very own audio interface. This means that you can simply connect your drum module to your computer via a USB cablevision, install the necessary drivers, and away you go.
To do this, follow the steps in Option 2, merely skip the parts about the audio interface and audio cables.
Option ii) Recording the audio output from your drum module via an audio interface
If your drum module does not take the ability to transfer audio via USB to your computer, then follow the steps beneath.
Drum modules more often than not include a headphone output and so you can hands monitor your practice and performance, but they likewise more often than not characteristic audio outputs that you can employ for recording and live performances.
What yous will need
The items yous will need for this are a reckoner, recording software (gratuitous software will do fine), an audio interface, and audio cables.
1) A computer (Windows, Mac, Linux)
You lot do not need annihilation fancy to record audio to a calculator. A very average computer should do fine, just brand sure that information technology meets the system requirements for the audio interface that you're planning to buy.
2) Recording software on your computer
You lot can use either free sound software such equally Audacity (Windows/Mac/Linux) or Garageband (Mac). You lot might already have one of these already installed on your figurer.
If you lot have a professional DAW (Digital Audio Workstation) such as Ableton Live, Logic Pro X, Steinberg Cubase, etc., then these will all work great.
At that place are also a agglomeration of good free DAWs to choose from.
3) An audio interface

Sound interfaces commonly connect to your figurer by USB. Drivers for these are usually very easy to install. The audio signal from the audio interface can so be hands recognized and recorded to your software.
Before ownership an audio interface, ensure that it is compatible with your reckoner's specific operating organisation version (due east.thou., Windows 8.1) and that it meets whatever other arrangement requirements of the audio interface.
I recommend investing a scrap of money in a decent sound interface. Very low budget ones can suspension easily or crusade annoying static sounds in your recording.
I highly recommend the Focusrite Scarlett 2i2 (3rd Gen) audio interface (Amazon link, Sweetwater Link). I take always institute their audio interfaces to accept very good audio quality for their price point. It is a very popular interface and its build quality is superb. It records very nicely and has ii inputs and 2 outputs.
four) Audio cables

Check the output connections on the back of your drum modules. The below directions are general instructions that should piece of work for the bulk of situations. However, if yous're in incertitude, then check the transmission of your drum module or look at the manufacturer'due south website for more than information.
If you run into two 1/four phone jack outputs (like that ones y'all plug into a guitar or other electronic instrument) for Left and Right, then get 2 i/4 inch TS (tip-sleeve) cables and connect both of these from your module to your interface.
If your pulsate module only has one unmarried stereo output, and so yous should employ a TRS (tip-ring-sleeve) cablevision as these cables can support stereo signals, whereas TS signals just support mono signals.

Additionally, if your module only has one i/viii inch output (the same size as earphone slots on your phone or laptop), then you may need a 1/8 inch to 1/four inch TRS cable or an adapter from 1/eight to i/4 inch.
Step-by-stride instructions for recording audio from your drum module
- Plough on your computer!
- Utilise the audio cable(s) to connect the audio outputs from your electronic drum kit module to the inputs of your audio interface. Plough up the proceeds or volume knob on your audio interface rail to ensure that an audio point volition exist passed through.
- Connect the USB output from your audio interface to the USB input on your computer.
- Launch the recording software awarding on your computer.
- Follow your audio software's directions to record sound. DAW software commonly consists of multiple tracks in one project. You lot simply need to select an audio track, select your audio interface's name every bit the audio input for the runway, "arm" the track for recording, then printing the tape button. The directions might differ slightly, but it's usually very similar to this.
- Start drumming. You will unremarkably meet visual representations of sound waves shown for the audio recording. This will exist a clear indication that you lot're successfully recording an sound signal from your drum module.
Bonus – Multi-rail recording
Lower-finish electronic drum modules usually just have a pair of stereo outputs. However, some higher-end drum modules contain either many different output jacks or the ability to multi-track record your audio via USB. This is groovy news for those that want to have a lot more than freedom later on.
Troubleshooting
Are you having issues with your recordings? Cheque out the possible solutions below:
Result – The audio interface is not existence recognized by my estimator
- If you're using a Windows computer, check to ensure that the recommended drivers are being successfully installed.
- Do any messages pop upward stating that drivers have not been successfully installed?
- Check the manufacturer's website of your audio interface for information and advice on any drivers that might need to be installed.
- Is the sound interface uniform with your computer and OS? Read the manual or check the box to detect out.
- The USB cable connecting the sound interface to the computer might be damaged.
- The USB slot on your figurer might exist broken. Endeavour another one, if possible.
- If all fails, sometimes just turning the calculator off and on really solves the problem!
- Information technology's possible that the audio interface is malfunctioning. Endeavor connecting the sound interface to another computer if you can.
Issue – I'm getting hiss or static noises in my recording
- This can hands occur on cheaper audio interfaces that cannot handle loftier input volumes. Endeavour to lower the book of the input on your audio interface and come across if you lot can become a reasonable betoken without sacrificing audio quality.
- Try to listen to the audio betoken on your electronic drum fix to ensure that the hiss is non coming direct from the drum module.
- Hiss can also be a result of electric signals interfering with your recording. If you lot're using a laptop with a working battery, plug out the AC power from the laptop.
- Hiss can be produced internally in your laptop or through other peripherals. If you have other devices connected to your computer, such equally hard-drives or USB midi inputs, remove these to bank check if it makes a difference.
Event – I'm getting latency or lag in my audio recording
This means that there can be a gap in fourth dimension between when yous hit a pad to when the bespeak is received and processed by your computer. This tin can be annoying.
- If y'all're listening to the sound output from your computer while information technology's recording, then endeavor to hook a gear up of headphones to the headphone output (if available) on your drum module. You lot can then mind to the audio recording through this without latency. If you're recording to a vocal, yous might need to drag and adjust the recording back in the runway to suit for the lag.
- Check the manufacturer'southward website or manual for your sound interface for troubleshooting tips on dealing with latency.
- If you're using a Windows car, try to configure the calculator for working with audio. Windows is very capable of processing sound, but by default information technology's not always prioritized. Yous can use the following guide, which goes through some steps on how to ameliorate the audio processing operation on your Windows computer.

Option iii) Record your drumming using MIDI
This is an entirely dissimilar approach to recording from your electronic drum set. Recording MIDI allows us to capture the digital notes from the drum pads and cymbals as you're playing them, this digital information can then be used to trigger pulsate samples or drum synths on audio software on your computer.
It might sound complicated, but information technology's not. MIDI (Musical Instrument Digital Interface) is very heavily used in electronic musical instruments for decades and is very widely supported by audio product software.
This can be a swell choice if y'all want loads of flexibility on your pulsate sounds and/or freedom to change or rework your drum rails.
What y'all will need
ane) A Computer
Every bit with recording audio, nothing too powerful is required.
two) Depending on the module of your drum module:A USB Cablevision OR A MIDI-to-USB Interface OR A MIDI Drum Module: Check the dorsum of your electronic drum module
-
USB Type A to USB Blazon B (The same equally many standard printer cables) If your drum module includes a USB output that supports MIDI transfer (similar to that of a standard printer cable – often USB Type A to USB Blazon B cable) and then you're in luck. All you demand is a USB cablevision to connect this to your estimator. These are very common in Roland Five-Drums for instance.
- If information technology includes a standard MIDI output, then you will demand a MIDI-to-USB converter or interface to exist able to digitally transmit the MIDI information to you estimator. These are very inexpensive to go your easily on. Alternatively, the Scarlet 2i4 audio interface that I previously mentioned likewise includes MIDI capability. Therefore y'all could connect MIDI cables from your drum module to that interface.
-
MIDI to USB Converter – A inexpensive and easy option If your pulsate module does not support external MIDI options, then y'all would demand to become your hands on a better drum module or a carve up MIDI drum module. However, this is not ideal, every bit it requires the highest cost and most amount of work.


iii) Virtual Drum Software or a expert DAW (Digital Audio Workstation)
In that location are a broad multifariousness of drum software applications and VSTs around.
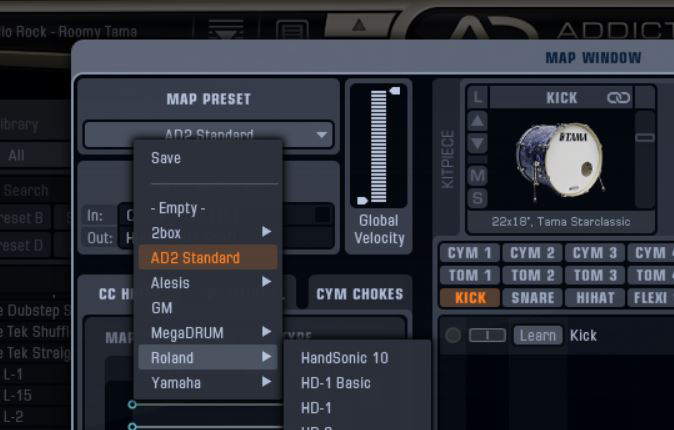
Addictive Drums 2 or Toontrack EZdrummer 2 both work great for this. Yous tin run them as standalone applications or use them as a plugin inside your recording/production software.
Here is a great video showing an electronic drum set up triggering Addictive Drums 2 (note, the sounds you are hearing are non from the drum module, they are coming from Addictive Drums ii and being triggered via MIDI from the drum module). This might sound complicated, but it's quite piece of cake to prepare.
Addictive Drums 2 contains a really nice MIDI mapping department that tin can assistance you automatically map to many different models of electronic pulsate sets. You can also create your own custom mappings.
Also, many DAWs already include their ain drum racks that y'all tin map to the MIDI inputted from your electronic drum gear up.
On top of this, check out the post-obit listing of proficient free drum VSTs. They don't all work as easily equally the paid options, but you tin can still go some great sounds out of them if you're comfortable working with MIDI.
Step past step
- Turn on your estimator
- If your electronic pulsate gear up module does non support MIDI, so take out all of the drum and cymbal pad inputs from the drum module and insert them into the inputs of your MIDI drum module.
- Connect the MIDI output from your drum module or MIDI pulsate module to your computer (either through a MIDI-to-USB, or using a MIDI interface, or using a USB-to-USB connection if your pulsate module supports it).
- Launch your pulsate recording software or DAW.
- Follow the instructions of your recording software to map the MIDI notes to your desired sounds. This can vary a lot depending on what software yous're using. We showed you above how information technology'south done via Addictive Drums 2. Alternatively, if you are using an electronic drum pad with Ableton Live, cheque out this smashing list of gratuitous Max4Live devices from Ableton Drummer which tin can make mapping a lot easier.
- Printing record.
- Kickoff playing your drums. If you're viewing your drums on a MIDI runway in a DAW, then the recording will look very dissimilar to an audio recording. It will show up a set of discrete notes that correspond to exactly when you're hitting your drums.
- After playing, you can tweak or modify around your MIDI track. For example, DAWs generally include the ability to quantize your MIDI notes, which align your notes to a grid (you can usually change the size of the grid, e.g., quarter notes, sixteenth notes, etc.). This tin can modify your drum notes to stay in time.
Pros and Cons of Recording Audio vs Recording MIDI
Recording the sound output from your module or recording the MIDI to your computer can both be cracking options. Nevertheless, both have their pros and cons.
Recording sound from your module:
Pros:
- Great for recording practice sessions every bit it requires minimal endeavor.
- Very easy to practice. Using this arroyo, you lot merely record the audio bespeak from your drum module. Information technology does non crave messing with MIDI mappings on your DAW software.
- What you hear is what you lot get. If you lot're happy with the internal sounds of your electronic drum set, and then you can record them direct to your reckoner equally-is.
Cons:
- Well-nigh electronic drum modules only include stereo outputs. That ways that you cannot split the audio signals of your drums into different tracks on your computer. This is more often than not not a problem for recording practice or doing rough demos. However, it can be an consequence if you really want to procedure and mix your different drum sounds. Please note, that some higher-end drum modules, such equally Roland TR-20, include many more outputs. If the drum pads and cymbals on your e-drum kit connect to your pulsate modules via 1/4 inch audio cables, then yous could hands swap out your current module for a higher-end ane.
- What y'all hear is what you get. If you're non happy with the internal sounds of your electronic drum set, so yous might non be happy with the finished recording. It tin can be hard to swap out the individual sounds of the drums if you're using a stereo output. Even if y'all do, it will require manual MIDI mapping, or tweaking of automated MIDI recognition on your digital audio workstation.
Recording MIDI to your computer:
Pros:
- More flexibility for your audio. You can modify the samples or drum synths on your reckoner later on.
- More flexibility for your drum tracks. MIDI notes can be re-arranged or automatically quantized to stay in fourth dimension.
- Meliorate mixing. As stated previously, virtually drum modules only have stereo outputs. When recording MIDI, you can process the sounds of each drum hit differently, due east.m., through music mixing techniques such as EQ, compression, reverb, misc furnishings, etc.
Cons
- MIDI mapping. This is not overly complicated, just it can get a bit tedious if you're trying to do anything besides circuitous.
- If you're simply looking for a recording of what's coming out of your pulsate module, then this approach tin be a chip overkill.
- If your pulsate module does not support MIDI outputs, then it'due south an extra expense to buy a MIDI drum module.
If you're but recording for personal or ring exercise, and then I think the direct sound output is the best option. It'southward easy, and does not require messing about with MIDI mapping to your computer'due south DAW. If y'all're doing anything more comprehensive, such as using your electronic drum set recording for music production or professional releases, then I'd recommend that you go the MIDI route.
In my opinion, the all-time option is to combine both of these option together if you lot tin can, as it gives y'all the well-nigh corporeality of freedom. Higher-end Roland 5-drum modules usually include a USB connection that can transfer both sound and MIDI at the aforementioned fourth dimension, which is a fantastic feature.
Summary
So, that's my commodity on how to record electronic drums to your computer. It'southward mostly a pretty straightforward process, but there can be a few standard technical problems issues along the fashion.

However, once you lot get past these issues initially you should be ready to record in a flash in futurity. You won't take to go through the process of re-setting upward microphones and mixers similar you would with an audio-visual drum kit.
Have you run across any other issues while recording that I haven't listed above? If and then, please write a question or comment beneath!
rodriguezswitithe.blogspot.com
Source: https://www.electronicdrumadvisor.com/record-electronic-drums/
0 Response to "Uploading Soumds to Beat Pads Mk2 Tracktion"
Publicar un comentario